mickoo

Western Thunderer
Bob,

Welcome, and thanks for the comments.

Likewise I have never had much luck with the vertical laminated style, getting even the thinnest needle file in the guide surfaces is a nightmare.

The only trick you have to remember is to not solder the jogged bit at the front end of the lower assembly until it is bent, as you jog it the three layers slide past each other to the new alignment, if you do solder it you will not get a neat sharp bend on the outside, once you grasp that they bend and solder up really easy.

Would love to see some photos of your finished items if you get the chance, all we need now are some Thompson and Peppercorn pacifics in the stable ;)

Mick D
 

Silverystreaks

Western Thunderer
Thank you for the reply Mick. Regarding your mention of Thompson and Peppercorn pacifics, I recall regularly begging Martin to produce a Peppercorn A1 but he never did. I eventually got hold of a second hand un built DJH Ltd Edition A1 that when completed reduced the yearning for a Finney one.

Should a Finney 7 variant be somewhere on the horizon then that yearning would almost certainly reappear. Problem is that those of us that can recall the real 12 inches to foot ones are running out of years

Regards
Bob
 

mickoo

Western Thunderer
Bob,

The W1 project is top priority, following that I have committed to another (currently undisclosed) project for Finney7 but after that it could easily be a Peppercorn A1 or A2 they, and the Thompson Pacifics are certainly on my to do list, as are a few others.

But, one has to consider all future projects to see if they are viable products for sale before fully committing.

Concentrating on the LNER engines short term makes sense as we already have a good range of castings to suit, that reduces the workload and time scale drastically, it also fills in some holes that are begining to appear as ranges are cut back or absolved.

I think David Andrews still produces the A1 and recently withdrew the A2, sadly that range seems to get smaller and smaller every month.

Mick D
 

Silverystreaks

Western Thunderer
Mick
I agree wholeheartedly with your logic and forward thinking re Finney 7 projects, whatever is planned will need to sell and recoup any investment. The improvements already witnessed via this W1 build will in my opinion not only please former Finney aficionados but should attract new customer's as well.

Incidentally, I did have a DA A1 kit but then one of the DJH Ltd editions turned up, in the end the DA kit was sold on. I have not regretted that decision.

Regards
Bob
 

Ian@StEnochs

Western Thunderer
But, one has to consider all future projects to see if they are viable products for sale before fully committing.

Concentrating on the LNER engines short term makes sense as we already have a good range of castings to suit, that reduces the workload and time scale drastically, it also fills in some holes that are begining to appear as ranges are cut back or absolved.

I think David Andrews still produces the A1 and recently withdrew the A2, sadly that range seems to get smaller and smaller every month.

Mick D

DA kits are not to Finney quality! I have had a DA Jubilee on the go for longer than I care to think and it has needed a lot of work to bring it up to an acceptable standard.
You already have the Duchess casting patterns so how about a state of the art Jub?

Ian
 

mickoo

Western Thunderer
DA kits are not to Finney quality! I have had a DA Jubilee on the go for longer than I care to think and it has needed a lot of work to bring it up to an acceptable standard.
You already have the Duchess casting patterns so how about a state of the art Jub?

Ian
Please do not tempt me to the LMR, that's my first love and joy, Cheshire 1958-1964 era and Jubilees are one of, along side the A3, rebuilt Patriots, Princess Royals and Britannia's, my top engines.

However, sensible head on, moving to LMR projects does not make viable sense in the short term, especially as you have to develop a whole new range of castings and fittings. But, trust me, once the wheels are firmly on this wagon then I will look at LMR stuff.

I've enough drawings and info to start the A3, Princess and Britannia but decent drawings of Patriots and Jubilees is another matter, mind I have not explored the NRM collections in detail as yet.

I also have the DA A3 and A1, and I've had and moved on the Jubilee and Princess Royal, for the same reasons you note, the A3 has so much work in it I have to keep it, the A1 tender is complete bu the engine is still in the box.

I accept the differences in standards but in the defense of DA, they do have a place and are very popular with a great many builders.

Now a Princess Royal, Jubilee or rebuilt Patriot in 1:32 would be a rather nice fancy to have ;)

Mick D
 

mickoo

Western Thunderer
Mick
I agree wholeheartedly with your logic and forward thinking re Finney 7 projects, whatever is planned will need to sell and recoup any investment. The improvements already witnessed via this W1 build will in my opinion not only please former Finney aficionados but should attract new customer's as well.

Incidentally, I did have a DA A1 kit but then one of the DJH Ltd editions turned up, in the end the DA kit was sold on. I have not regretted that decision.

Regards
Bob
I've also got the DA A1, the tender went together rather well and looks the part I think, my only niggle was the buffers with the big bolts sticking out the back and conflicting with the frames, my work around wasn't that good and they've eventually seized. I've not tackled the engine but after the woes of the A3 might not be so keen. Mind it is a newer designed model so should go together easier than the A3. There's a couple of threads around here detailing those two projects somewhere, if I can ever find them again to update once I get back to the models :rolleyes:

But, as you say neither have the fidelity between the frames that the W1 has, but then that's not everyone's cup of tea, though it seems to suit MoK customers very well, so it can't all be bad.

Mick D
 

Silverystreaks

Western Thunderer
Mick

If you ever have any "spare time" on your hands (Hmmmm) and get around to finishing the A1 and A3 bin the double chimneys and replace with ones from guess who -- MF. I even have one of them on my DJH A1

Call me a double chimney freak but I have amassed many castings over the years from many producers but without doubt Martin produced the best.

Mind you it was not the same with his A4 double chimney that was replaced by one produced by DJH which originated from their first A4 run

Anyway lets get back to the W1 build

Regards
Bob
 

mickoo

Western Thunderer
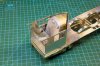
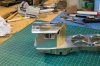
Final parts going on the cab.

Just vents and wind cutter screens to test fit and it's done, it's been a chore for sure but these etches are nearly finally ready to be let loose on the world.

Most of the delay is cleaning it all up, photographing and writing the instructions. I'd hoped to bundle up the footplate etches to send tonight but that's tomorrows chore, followed by a final check of the cab and sending that off, probably Friday now.

IMG_6976.jpg
Still need to sort the back head spacer to suit the cab and mark up for safety valve fitting.

IMG_6978.jpg
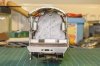
Roof on, it fits, but is not yet soldered into position, I'm having a rethink on the windscreen glazing construction, currently it forces you to fit the roof last after everything has been painted, there may be a better way.

Traditionally you fix the floor to the cab sides, then add the back head and finally the roof, however, having a close association with the Finney Battle of Britian cab for the 1:32 test build shows it can be done differently.

Basically you split the floor into two, a front and a rear, the rear is fixed to the cab and the the roof fitted to form a rigid box, the front footplate section has the back head on and is inserted from below once it's all fully detailed, which means that whilst it's out you can glaze the front easily with the roof on as there's plenty of room to get in there.

IMG_6980.jpg
Checking to make sure the gauge plates clear the back head, they do, just, mops brow!

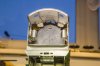
IMG_6981.jpg
View showing underside of cab roof, to get a perfect 'repeatable' joint between the raised section and main cab roof requires a ledge for the raised parts to sit on, which leaves a small ledge on the underside for the strapping to bridge, but leaves a small step, not happy about this. This strap and a couple of others left off for my sanity's sake have vexed me for months now, resulting in the whole model nearly being thrown in the bin several times.

I may revisit this single part later before final production, coz it's really ticking me off, but I need to get on with other stuff first.

Mick D
 

warren haywood

Western Thunderer
Mick,
From a painting point of veiw the cab roof needs to be off ideally, trying to blow paint into those corners would be a nightmare not to mention access for masking.
 

mickoo

Western Thunderer
Mick,
From a painting point of veiw the cab roof needs to be off ideally, trying to blow paint into those corners would be a nightmare not to mention access for masking.
Warren,

I was thinking about painting too, I see no difference between the cab roof being off or the floor being off as far as I can tell, it's still a four sided box is it not?

The only other way is to try and design some sort of fixing arrangement for the cab roof and still look authentic and be robust enough for use. I'll ponder it for a while and see if anything pops up ;)

Mick D
 

FiftyFourA

Western Thunderer
A daft question, but how are the pieces of this loco held together? It must be will-power because I can't see any solder.

This workmanship is on another level. Seriously impressive.
 

mickoo

Western Thunderer
A daft question, but how are the pieces of this loco held together? It must be will-power because I can't see any solder.

This workmanship is on another level. Seriously impressive.
:D

There's still quite a lot of solder, still too much for my liking, but I'm getting better.

The trick is to solder in areas not visible, so the cab dias for example are soldered under the floor on the slot and tabs, it's easier to do when your designing the kit as you can add blind solder points as you make up the etch work.

The other advantage of nickle silver is that it's the same colour as solder, so that hides the bits that are not blind soldered.

On top of that I clean as I go along, usually with a several different grades of fibre brush, but the biggest secret is less solder, the less you use the less you have to clean and it takes very little to hold a good joint. It is important to make sure your joints are as good as you can get before soldering, you need the best metal to metal contact you can get, so that means removing virtually all of the cusp on the joints.

Mick D
 

Nick Dunhill

Western Thunderer
Can I make a suggestion? Perhaps you could not put the slot between the windows for the cinder guard? Hobbyhorse do nice castings for them and I will only have to fill the slots?? Sorry....
Nick
 

mickoo

Western Thunderer
Can I make a suggestion? Perhaps you could not put the slot between the windows for the cinder guard? Hobbyhorse do nice castings for them and I will only have to fill the slots?? Sorry....
Nick
Waaaggg :eek::rant:

Ok...breath :cool:

That means I need to make a special run for your two then as the Finney7 kit has etched ones for the slots. I'll mail PPD, hopefully it's not too late to stop the run and change the art work.

Mick D
 

mickoo

Western Thunderer
Thinking about this further, why do you need to fill the slot? It's only o.4mm wide surely the brass replacement is wider than that so will naturally cover it?
 

Silverystreaks

Western Thunderer
a Mick

Re the issue of whether to secure the cab roof before or after painting. A modelling pal of mine introduced me to a method that I have subsequently used on my Finney A4 A3 and V2.

I soldered a 60/65mm length of 2mm dia brass rod to the underneath of the Cab roof of my A4 centrally in the space between both safety valve openings, process the other end of the rod to take a 10Ba nut. Drill an equivalent hole through the top of etch between the holes that the safety valve casting fit into, that's the etch that the White metal cab back plate affixes to.

Now the difficult part, turning the loco over then trying to estimate just where to drill the hole in the floor that the end of the brass rod should protrude through. There should be enough of the rod protruding through the underneath of the cab floor to attach a 10BA nut, the roof should then snuggle down precisely in place. Once the loco has been painted remove the roof and affix all of cab back plate detail /windows etc. then drop the roof back in place reaffix the 10ba nut. job done.

Regards
Bob
 
Last edited:

Dog Star

Western Thunderer
Now the difficult part, turning the loco over then trying to estimate just where to drill the hole in the floor...
How about using a long series drill in a pillar drill? Support the body on the drill table and make the hole in the floor etch with the drill passing through the hole in the Vee etch.

Or maybe ask a Finney designer to consider incorporating this suggestion in any future amendments to Gresley locos.
 

Steph Dale

Western Thunderer
Bob,

Interesting approach, but I wonder if tapping the end of a suitably sized brass tube might be easier. I always seem to find it easier tapping holes rather than dieing rods and screws easier to do up than nuts! Another alternative could be to use threaded rod (studding) which can be readily sourced, e.g. from eBay.

Neat trick though, and one I shall happily plagiarise.

Steph
 
Last edited:
Top